10 Easy Ways to Create Lifts and Drops in Ableton Live
- DJ Terhinator
- Dec 2, 2022
- 3 min read
What would a song be without some well-placed lifts and drops! Finish up your track of any genre with these 10 useful tips by Ableton Certified Trainer LNA.
The easiest way to create a drop is to highlight a bar and delete everything on it. Try it e.g. between the verse and the chorus. Leave it as it is or fill it with something simple like a clap or a hit.

Take the last word (or another appropriate part) of the vocals and chop it rhythmically making it shorter and shorter. Consolidate it (CTRL/CMD + J), open the clip envelopes and transpose it down an octave.

Make a drop by deleting a bar like on tip number 1. Find a cymbal sound with a long enough decay, open the clip view and reverse the clip by clicking the reverse button.

Choose Auto Filter and drag it on the master track to affect the whole song or on a group track to affect a specific group of tracks. Automate the frequency control and add breakpoints to create a drop.
To add an extra effect, add a hit into the drop – in that case don’t use the master track for your Auto Filter or you won’t be able to hear the hit.
Add a drum kit on an empty track and draw a kick drum on every beat of the bar. Make another two clips with the drum hits doubling twice in speed. Layer different sounds and loop the clips as desired.
When you’re ready, right-click to freeze and flatten the outcome to convert it into audio. Finalise by transposing it in the clip envelope editor just like on tip number 2.

Add an Auto Filter on an instrument or a group of instruments and automate its frequency control exactly like you did on tip number 4. This time, instead of creating a drop, make it open up gradually to create a subtle lift. This kind of lift works especially well in intros and C-parts.

Find a white noise sample and add an Auto Filter on it.
Automate the frequency control like before.
To add a pulsing movement, use the LFO controls: add amount, choose the wave shape and set the rate. By automating the rate you can even make the pulsing effect go faster and faster.
Add a Compressor on a synth track. Then add a new track with a drum lift like on tip number 5. When you’re ready, mute the second track.
Go back to the Compressor, activate the Sidechain and select the muted drum track as your input.

Add compression to hear the sidechain – whenever the muted drum beats, the synth sound ducks down! The lower the threshold, the bigger the ducking effect.
When you’re happy with the result, freeze and flatten the sidechained synth track, so that you can transpose it in the clip envelope editor if needed. At this point you can also delete the muted drum track – you won’t need it anymore.

Add an Arpeggiator on a synth track. Change the rate setting from Sync to Free and automate the rate. Make sure to use the pen tool to draw the automation so that it follows the tempo of the track.

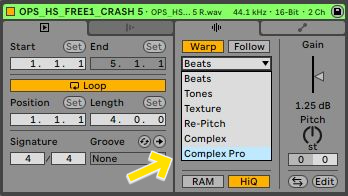
Just like you reversed a cymbal on tip number 3, you can reverse other sounds as well. Reversing, extending and shortening are easy ways to create interesting sounds for your lifts and drops.
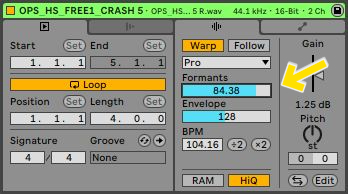
If the outcome seems crackly, choose Complex Pro and take the formants down.
Finally, layer your lifts and drops to give the track more character. Layer both high and low frequencies, be creative and most importantly – have fun!
Cover photo: Antoni Shkraba / Pexels